1. Getting Started
Create your account
Visit the app and register with your email address and a strong password (at least 12 characters with uppercase, lowercase, number, and special character).
Create a case
Once signed in you will be prompted to create your first case. Enter your basic details — your name, your spouse's name, and any court reference if you have one.
Land on the Dashboard
After creating a case you will see the Form E Dashboard — your central hub for completing your financial disclosure.
2. The Form E Dashboard
The dashboard gives you an at-a-glance view of your disclosure progress. The compact header shows the signed-in user, role, profile link, help link, and logout control without taking space away from the dashboard.
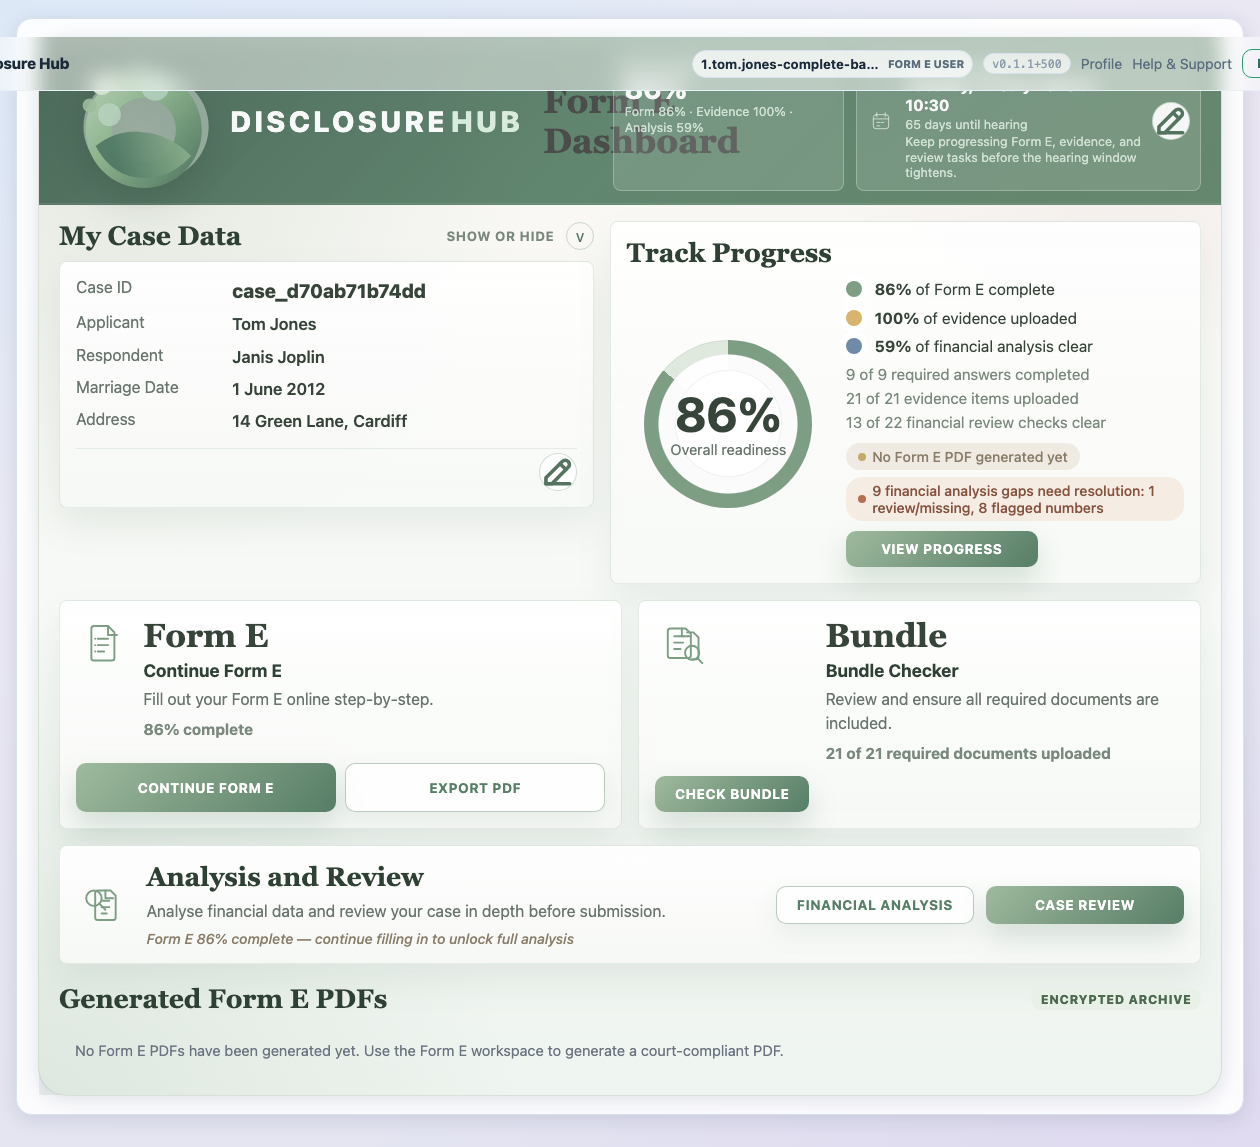
The dashboard is divided into four areas:
- My Case Data — a collapsible summary of key facts about your case. The edit and hearing-date controls are compact icon buttons with screen-reader labels.
- Action Cards — quick-launch tiles for the two main workflows: continuing the Form E itself and checking your evidence bundle.
- Track Progress — a completeness gauge showing Form E completion, evidence progress, financial-analysis clearance, generated PDF status, and any outstanding review items.
- Generated Form E PDFs — a chronological list of every Form E PDF you have generated, with options to re-download, add notes, mark as court-submitted, or delete.
3. Completing Your Form E
Click Start Form E on the dashboard to open the guided form. The form is broken into sections that mirror the official Form E structure:
- Personal details and marriage information
- Property and land
- Bank accounts, savings, and investments
- Pensions
- Liabilities and debts
- Income and employment
- Business interests
- Other assets
- Income needs and budget
How the AI assistant helps
As you fill in each section, the AI assistant reviews your answers for completeness and consistency. It can flag missing information, suggest evidence you may need to upload, and highlight potential issues to check before you submit.
Section navigation
Use the sidebar on the left to jump between sections. Completed sections show a tick; sections needing attention show a warning indicator.
4. Uploading Evidence
Many Form E questions require supporting documents — bank statements, payslips, property valuations, pension statements, and more.
- When a question requires evidence, an upload prompt appears directly below it.
- Accepted formats: PDF, JPEG, PNG. Documents are converted to PDF automatically where needed.
- Each uploaded document is linked to the specific question it supports.
- After upload, the form shows whether the evidence was added to the bundle or whether you need to retry.
5. The Bundle Checker
Click Check Bundle on the dashboard to open the bundle view. This shows documents commonly needed for a structured disclosure pack, organised by Form E section.
- Green rows indicate documents that have been uploaded and matched.
- Amber rows indicate documents that are missing or incomplete.
- You can upload missing documents directly from this view.
When your bundle is complete, you can export it as a single PDF pack for your own review, solicitor review or use in the financial remedy process.
6. Generating Form E PDFs
From the Form E workspace, click the Generate Form E PDF button at the top of the page. This produces a formatted PDF using the Form E template, with your answers filled into the relevant fields.
- The PDF is generated and downloads to your device.
- An encrypted copy is automatically saved to your case for future reference.
- All five Form E sections can be populated — personal details, financial details, financial requirements, other information, and orders sought.
- Date fields are split into day, month, and year to match the court format.
7. Managing Generated PDFs
Every Form E PDF you generate is listed in the Generated Form E PDFs section at the bottom of the Form E Dashboard. Each entry shows:
- Date and time — when the PDF was generated.
- Status badge — either Draft or Court Submitted.
- Notes field — add a comment to remind yourself what this version was for (e.g. "Final version for FDR hearing").
Actions you can take
- Download — re-download any previously generated PDF at any time. The decrypted file is delivered directly to your browser.
- Mark as Court Submitted — once you have filed a version with the court, mark it as submitted. This locks the entry: the note becomes read-only and the PDF cannot be deleted, creating a clear dated record of the version you marked as filed.
- Delete — remove a draft PDF you no longer need. A confirmation prompt appears before anything is removed. Court-submitted PDFs cannot be deleted.
8. Tracking Your Progress
The dashboard progress section shows:
- Overall completeness score — a capped percentage reflecting form completion, evidence coverage, financial-analysis clearance, generated PDF status, and open review issues.
- Form E completion — the percentage of questions answered.
- Evidence uploaded — the percentage of required supporting documents provided.
- Financial analysis clear — the percentage of review checks without unresolved missing items, blockers, or flagged numbers.
These metrics update as you work through the form, upload documents, generate PDFs, and resolve financial-analysis review items. The completeness score cannot show 100% while the Form E is incomplete, no generated PDF exists, or unresolved financial-analysis gaps still need review.
The pre-submission review score is capped separately by Form E completion, evidence coverage, consistency checks, and open critical or high-priority issues. A review that still says Needs Work or High Risk will explain what is holding the score down.
9. Managing Case Data
Your case data (names, court reference, hearing dates) can be edited at any time from the dashboard. Changes to case data are automatically reflected in the Form E where relevant, so you only need to enter information once.
The next hearing date appears in the dashboard banner with the number of days remaining. The message becomes more urgent as the hearing approaches and changes on the day itself.
10. Reviewing Uploaded Documents
Open Profile from the header to review every document uploaded to your account. The My Documents table lists the document name, file type, size, upload date, and current status.
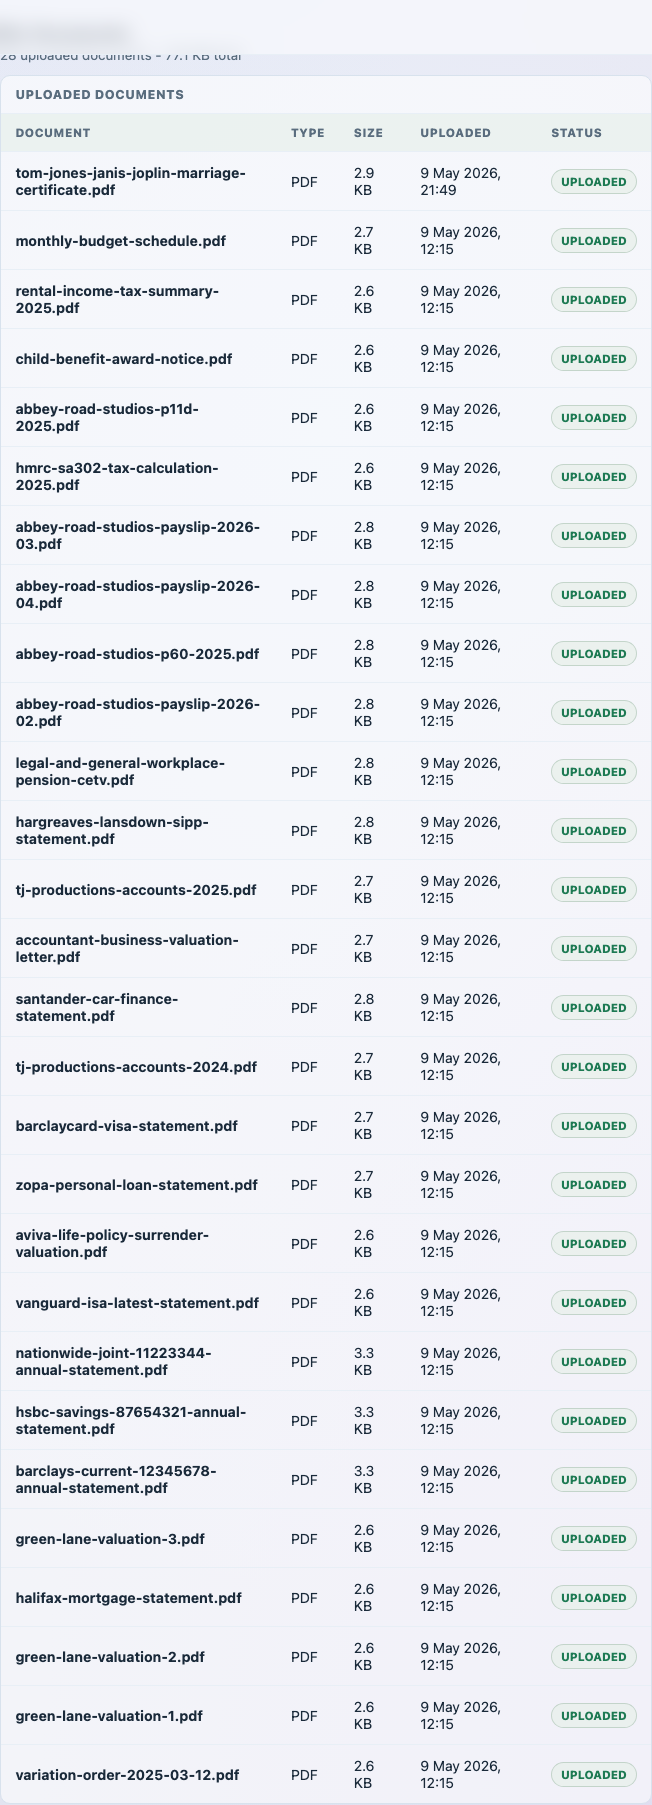
| Column | What it tells you |
|---|---|
| Document | The original file name. |
| Type | The detected file type, such as PDF or PNG. |
| Size | The stored file size. |
| Uploaded | The date and time the document was added. |
| Status | The current upload status. |
11. Tips for a Strong Disclosure
- Be thorough. Incomplete disclosure can lead to delays, further questions, or other consequences. Answer every question, even if the answer is "not applicable".
- Use current valuations. Property and asset values should reflect today's market, not the date of separation.
- Upload clear documents. Ensure scanned documents are legible. The system will warn you if an upload appears unreadable.
- Check the bundle before filing. The Bundle Checker is a useful preparation review point — use it, and get legal advice where your finances or dispute are complex.
- Keep your case data up to date. If hearing dates change, update them promptly so your dashboard stays accurate.